|
Forums46
Topics537,783
Posts9,729,086
Members87,042
| |
Most Online25,604
Feb 12th, 2024
|
|
|
 Re: A few of my projects in gunsmithing school(pics)
[Re: TDK]
#2065610
01/28/11 02:16 AM Re: A few of my projects in gunsmithing school(pics)
[Re: TDK]
#2065610
01/28/11 02:16 AM
|
Joined: Jun 2007
Posts: 41,320
BMD

Silver Spoon
|
|
Silver Spoon
Joined: Jun 2007
Posts: 41,320 |
|
|
|
|
Re: A few of my projects in gunsmithing school(pics)
[Re: BMD]
#2065700
01/28/11 02:35 AM
|
Joined: Sep 2007
Posts: 3,812
TDK
 OP
OP
Extreme Tracker
|
|
OP
Extreme Tracker
Joined: Sep 2007
Posts: 3,812 |
First project was learning how to do various muzzle crowns while keeping things within the blueprinted tolerance level. Every project has tolerance levels I must saty within or my grade suffers. The tolerances range from .005" to .0000". Also, every project started from 1018CR bar stock of varying diameters. Here are some pictures. Facing the stock to length in a 3-Jaw chuck: 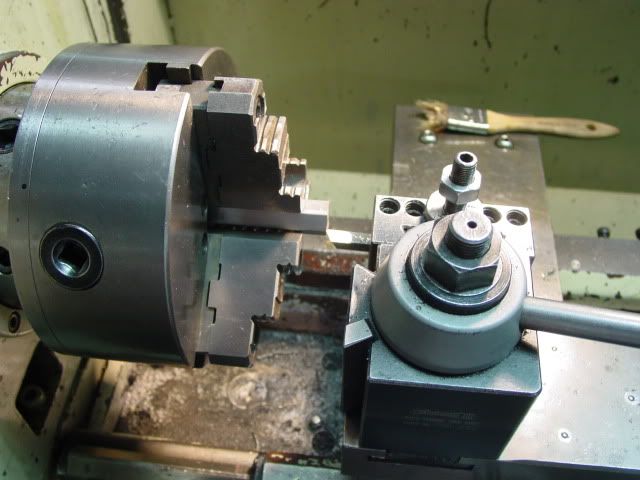 Here are the finished pictures. the left two are recessed crowns, the Middle is an 11 degree target crown, and the right two are polished hunter crowns: 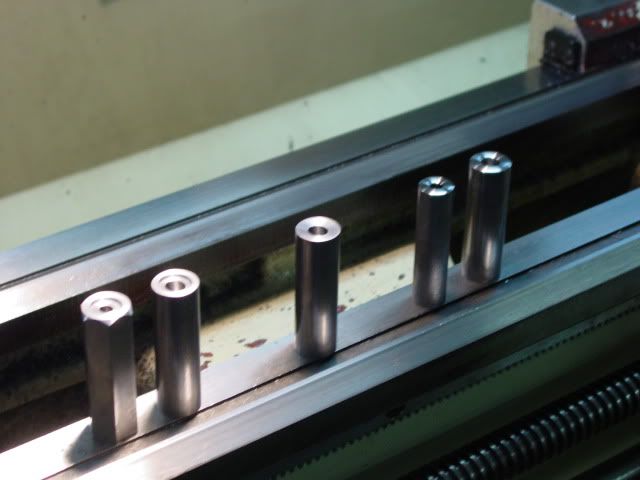 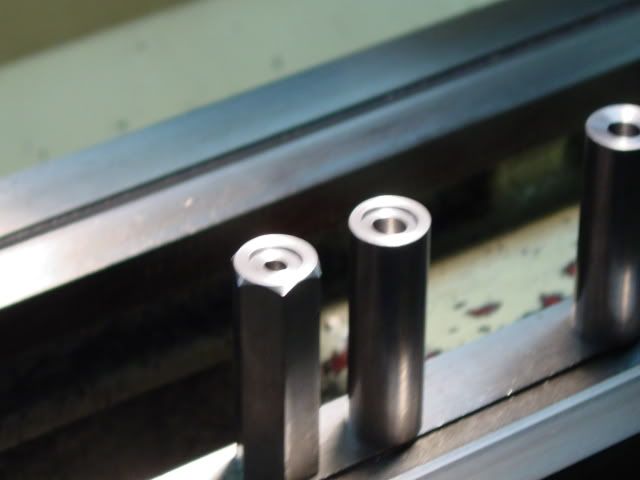 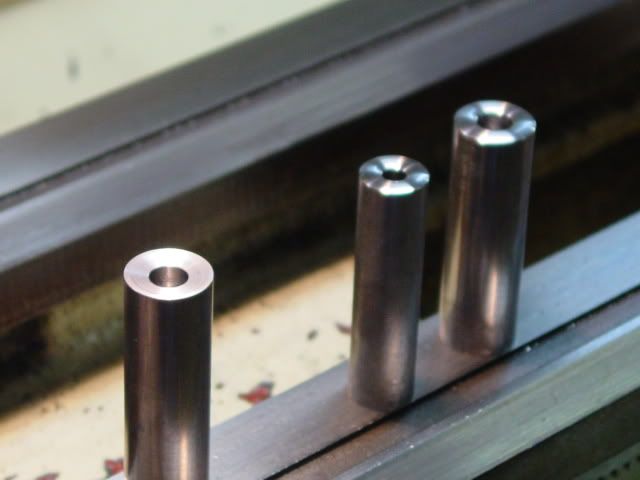 Practice Barrel 1 The next project was learning to turn down selected dimensions with the workpiece between centers. I also learned how to cut 45 degree shoulders. I drilled all the way through for future projects. This started as 1.250" stock: 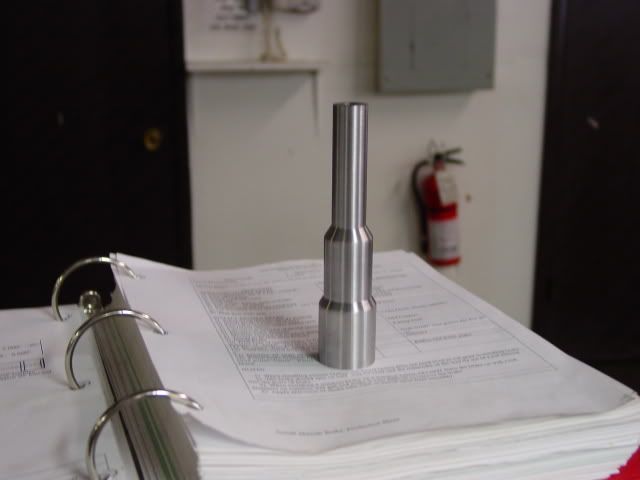 Then it was on to getting a straight taper. The taper was made by off-setting the tailstock to a specified length according to formulas. This also started as 1.250" bar stock: 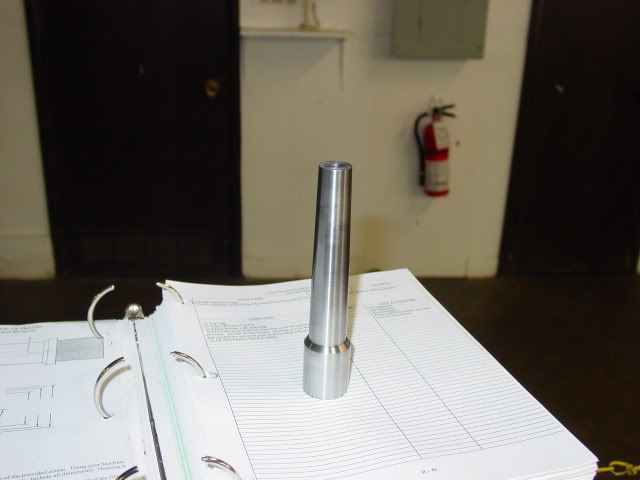
Last edited by TDK; 01/28/11 02:39 AM.
A.M. Little Bespoke Gunmakers LLC
|
|
|
|
Re: A few of my projects in gunsmithing school(pics)
[Re: TDK]
#2065705
01/28/11 02:37 AM
|
Joined: Sep 2007
Posts: 3,812
TDK
OP
Extreme Tracker
|
|
OP
Extreme Tracker
Joined: Sep 2007
Posts: 3,812 |
didnt get any assembled pictures of the tap guide assembled for some reason, but here it is non-the-less. Everything including the spring and screw were made on the lathe: 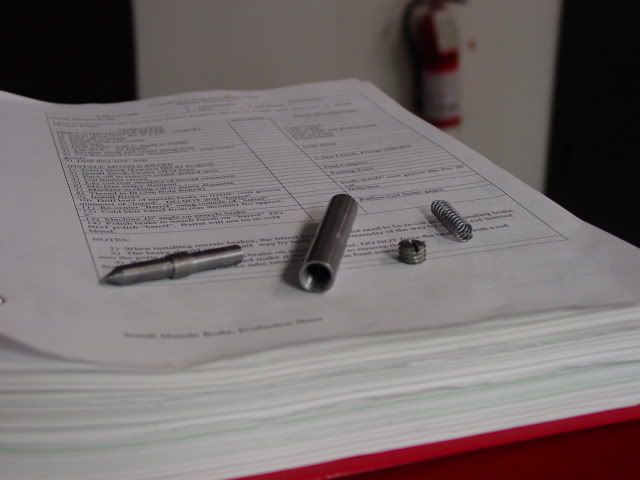 This one was a booger. This little tool is a firing pin potrusion gage. Not very hard to make, but the tolerances on the overall length were .0000", so basically we had no room for error using the micrometers we have. It was faced to length on the lathe to within .001", then the last bit was taken down by hand using 600grit sand paper and a flat honing stone.  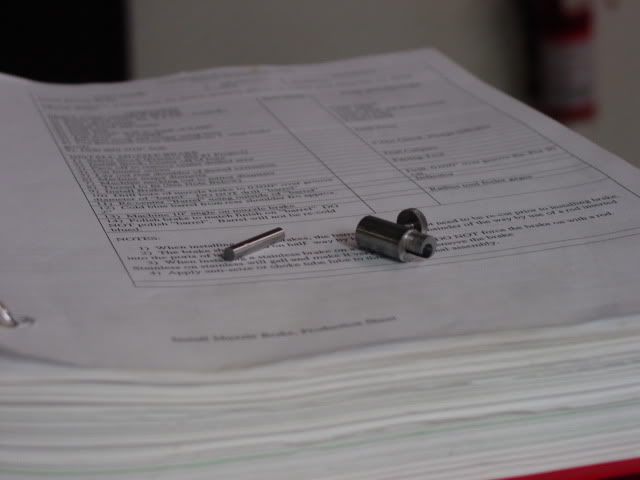
A.M. Little Bespoke Gunmakers LLC
|
|
|
|
Re: A few of my projects in gunsmithing school(pics)
[Re: TDK]
#2065722
01/28/11 02:41 AM
|
Joined: Sep 2007
Posts: 3,812
TDK
OP
Extreme Tracker
|
|
OP
Extreme Tracker
Joined: Sep 2007
Posts: 3,812 |
Last edited by TDK; 01/28/11 02:43 AM.
A.M. Little Bespoke Gunmakers LLC
|
|
|
|
Re: A few of my projects in gunsmithing school(pics)
[Re: TDK]
#2065746
01/28/11 02:47 AM
|
Joined: Sep 2007
Posts: 3,812
TDK
OP
Extreme Tracker
|
|
OP
Extreme Tracker
Joined: Sep 2007
Posts: 3,812 |
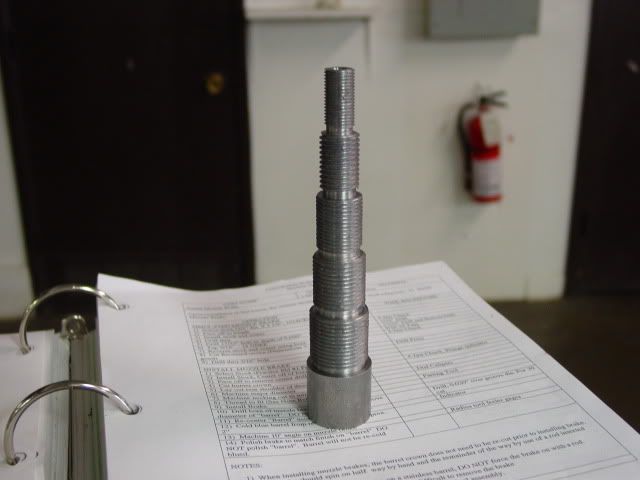
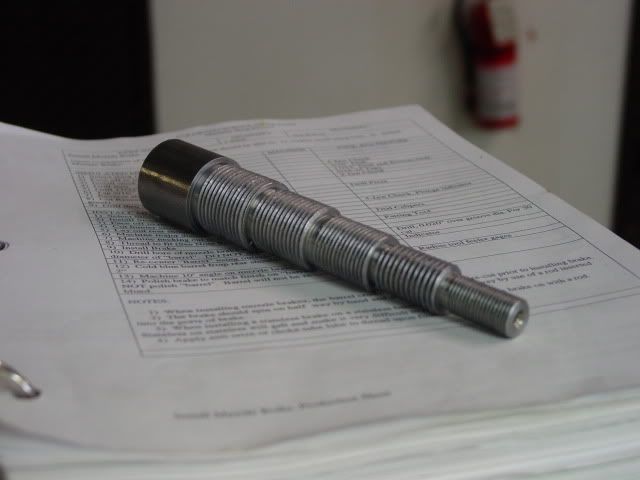
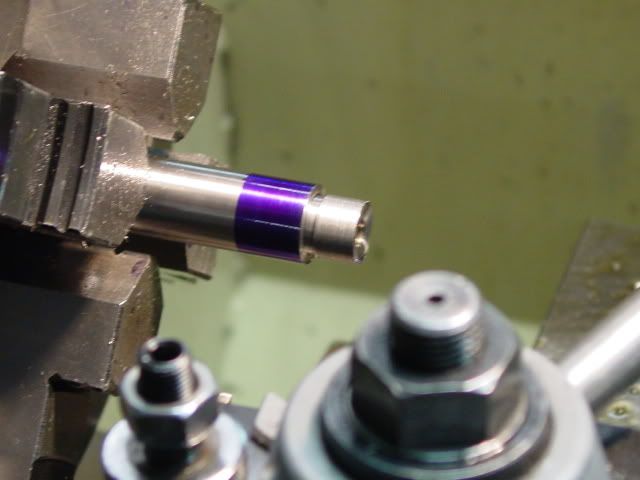
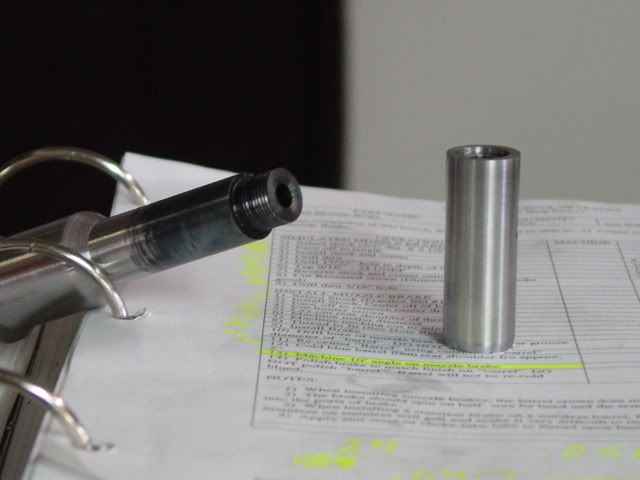
Here is my first attempt at barreling a Howa action which will be a big project as I progress through school. The "barrel" is just a piece of round stock and not an actual barrel. I first turned down the major diameter of the intended threads, and made it to a specified length to form the torque face. Then I made a necking cut up against the face to the minor diameter of the threads. After threading it I cut the bolt nose recess and began the chambering process. One this project they wanted me to use a No-go gauge in place of a Go-gage, and the field-gage is taking place of the No-go. basically what this is doing is making the headspace purposely long. I will be going back at a later date and learning how to correct this. I guess the figure if we can purposely make the headspace .004"-.006" long we can purposely make it perfect. Just noticed a little chatter on the recess walls... Pics: 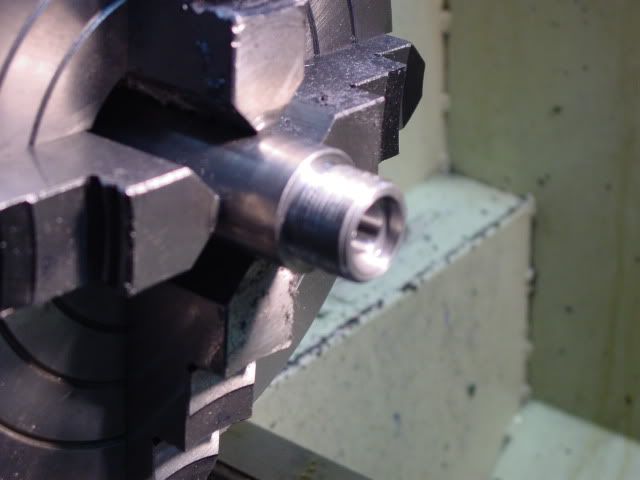 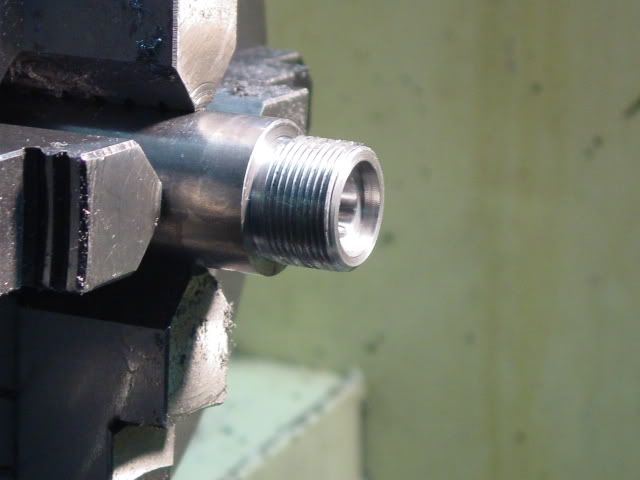 Here is the action installed with the bolt just barely closing on the No-go gage, and the bolt not closing on the Field-gage: 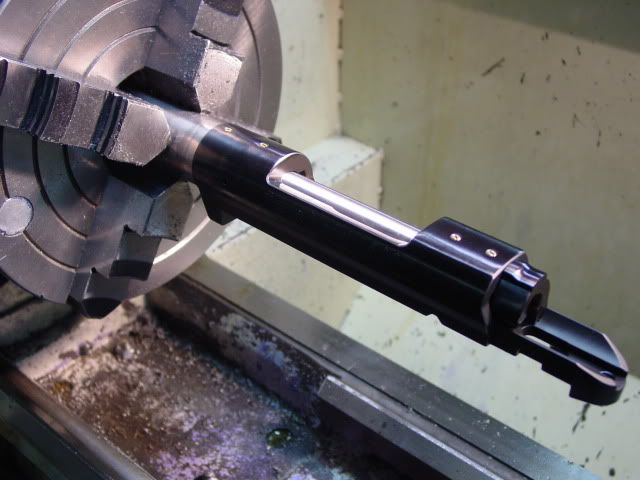
A.M. Little Bespoke Gunmakers LLC
|
|
|
|
Re: A few of my projects in gunsmithing school(pics)
[Re: TDK]
#2065750
01/28/11 02:48 AM
|
Joined: Sep 2007
Posts: 3,812
TDK
OP
Extreme Tracker
|
|
OP
Extreme Tracker
Joined: Sep 2007
Posts: 3,812 |
On my next project I did the same thing, but used an Enfield action which means that the threads are square instead of V-shaped, and instead of having a recess to clear the bolt nose, the Enfield uses a cone: Started with this: Then fitted the muzzle brake, and finally putting it on an action: 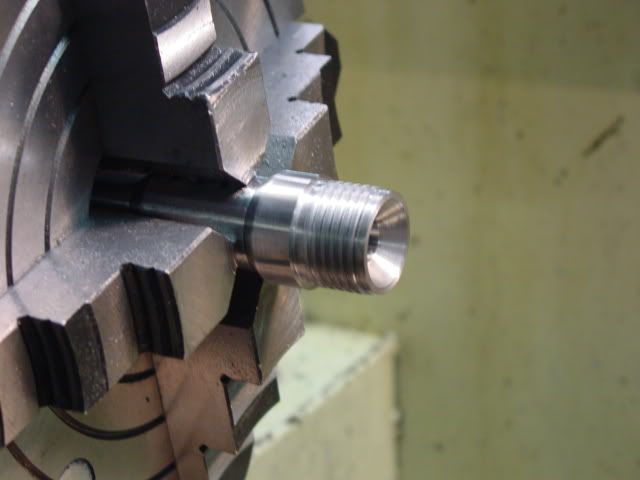 Same story on the headspace. Everything was on purpose, and will be corrected on a later date. 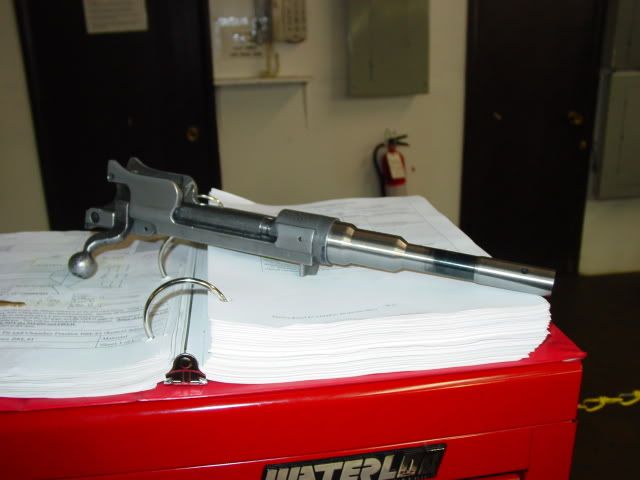
A.M. Little Bespoke Gunmakers LLC
|
|
|
|
Re: A few of my projects in gunsmithing school(pics)
[Re: TDK]
#2065764
01/28/11 02:50 AM
|
Joined: Sep 2007
Posts: 3,812
TDK
OP
Extreme Tracker
|
|
OP
Extreme Tracker
Joined: Sep 2007
Posts: 3,812 |
Finished installing the barrel to my Howa action today. This gun is going to be a hunting rifle. Here are the specs: The barrel is a Shilen Match Grade #4 contour unthreaded/unchambered blank. After the install I cut it down to 24" and machined in a recess crown for the added protection over the otheres. The receiver face was trued, and the locking lugs lapped for 90%+ contact. The headspace is a little tight, but the bolt did close on the factory ammo we fired out of it, and extracted fine after expansion. Didnt get any pics of the process, but its the same as the last two projects... I also made two sets of aluminum pillars, one for a wood stock, the other for a synthetic. 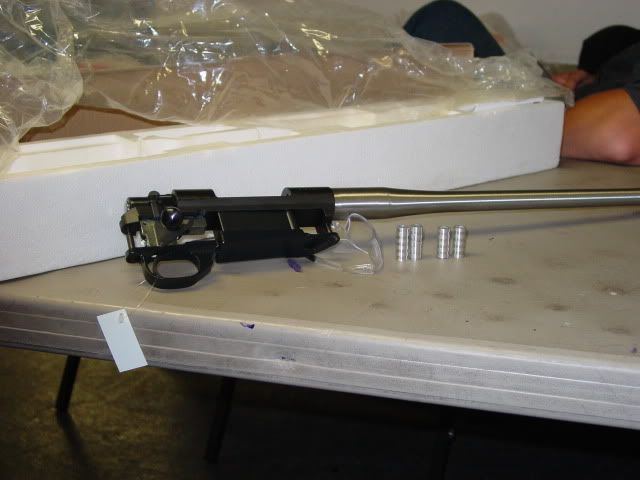 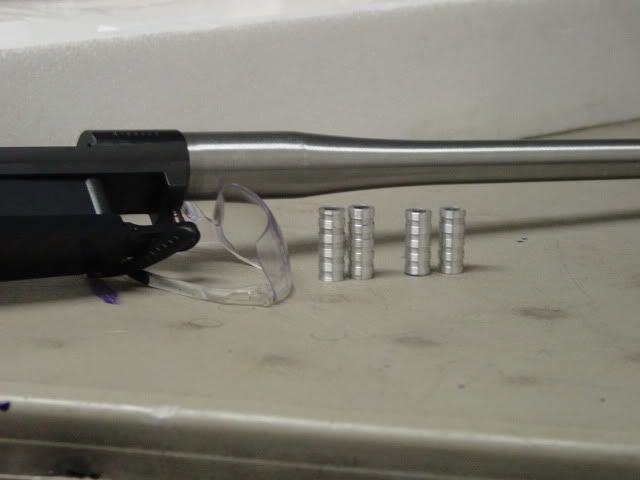
A.M. Little Bespoke Gunmakers LLC
|
|
|
|
Re: A few of my projects in gunsmithing school(pics)
[Re: TDK]
#2065832
01/28/11 03:07 AM
|
Joined: Feb 2007
Posts: 26,548
JCB
THF Celebrity
|
|
THF Celebrity
Joined: Feb 2007
Posts: 26,548 |
Very cool!!
Thats something I thought about geting into right after high school but I figured it was a trade that might not have much of a demand if they ever banned guns.
With my luck I would have went too school and the day I graduated they would have banned civilian arms.
|
|
|
|
Re: A few of my projects in gunsmithing school(pics)
[Re: JCB]
#2065840
01/28/11 03:10 AM
|
Joined: Sep 2007
Posts: 3,812
TDK
OP
Extreme Tracker
|
|
OP
Extreme Tracker
Joined: Sep 2007
Posts: 3,812 |
The vertical mill: The first project was making a simulated 1911 slide out of a piece of bar stock. I started this by facing off a piece of 1" bar stock to 4.600" in a lathe. Then moved over to the mill and began the learning process. First thing I did was cut the "side flats" onto the slide. I did this by cutting .050" off each side making the piece .900" wide. Then we turned it upside downa and cut .300" off the bottom to represent the area where it attached to the frame. The .300" was only cut a certain length on the slide, but I forget that dimension. Then I cut the ejection port to a specific dimension and finished off cutting a rear dovetail(not pictured) The next project was taking that slide and cutting the rear to fit a bomar style sight. Pic: 
A.M. Little Bespoke Gunmakers LLC
|
|
|
|
Re: A few of my projects in gunsmithing school(pics)
[Re: TDK]
#2065843
01/28/11 03:11 AM
|
Joined: Sep 2007
Posts: 3,812
TDK
OP
Extreme Tracker
|
|
OP
Extreme Tracker
Joined: Sep 2007
Posts: 3,812 |
Next project I moved back to the Enfield simulated barrel and installed sights on it. After that I jumped back on to the lathe and had to correct the excess headspace from before. Now since I have sights installed I cant just remove a few thousanths. Without going into great detail on this I basically took .100" off the face, recess, and shoulder to set the barrel back into the receiver farther; if you are wondering why .100", it is because an Enfield is threaded for 10TPI. The end result they are looking for is the barrel to index with the sights exactly vertical. Then I had to go back and deepen the chamber again to the now roughly positive .094"-.097" headspace. Jumping back to the mill I then cut a clearing for the extractor to go into. AKA a extractor cut. Pic: 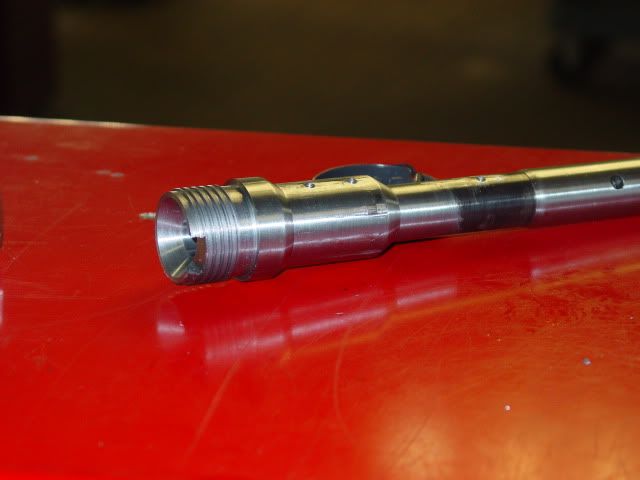
A.M. Little Bespoke Gunmakers LLC
|
|
|
|
Re: A few of my projects in gunsmithing school(pics)
[Re: TDK]
#2065849
01/28/11 03:12 AM
|
Joined: Sep 2007
Posts: 3,812
TDK
OP
Extreme Tracker
|
|
OP
Extreme Tracker
Joined: Sep 2007
Posts: 3,812 |
The mill portion of class is usually about 2weeks long, I finished that in 1 week. So now I am finished with machine shop, but I still have 2 1/2 week minimum before I move into stockbuilding class. Now normally they have little projects you can do for extra credit, but after looking at the blueprints for a while I decided I already knew how to build said projects, and I wasnt really learning any new skills. I came to the conslusion that it would probably be a good idea to put some more work into my Howa build to set myself apart so-to-speak. Here is what I came up with, I wont go into great detail because if you have never used a mill you wont understand some of the things I say. But I can tell you I have learned many new things and although I got a little over my head becuase of the time constraints, I think it will work out. If you look on the barrel here you will see two small barrel bands. These started out as 1" bar stock. The were turned down and believe it or not the inside diameter is actually slightly tapered. The more I learn...The front band is the beginning of a front sight, and the rear band is the beginning of a sling swivel. 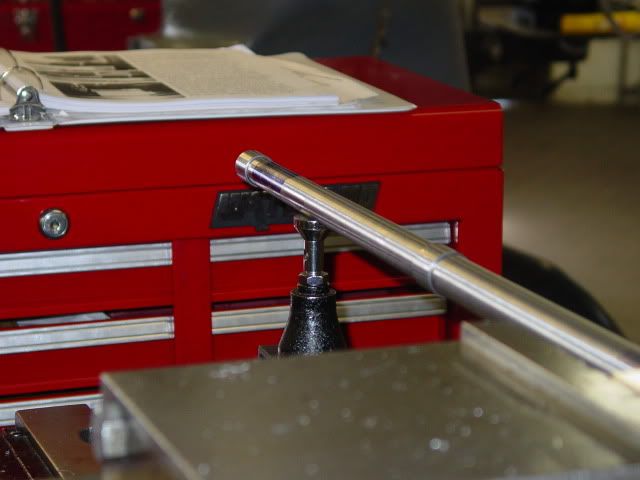 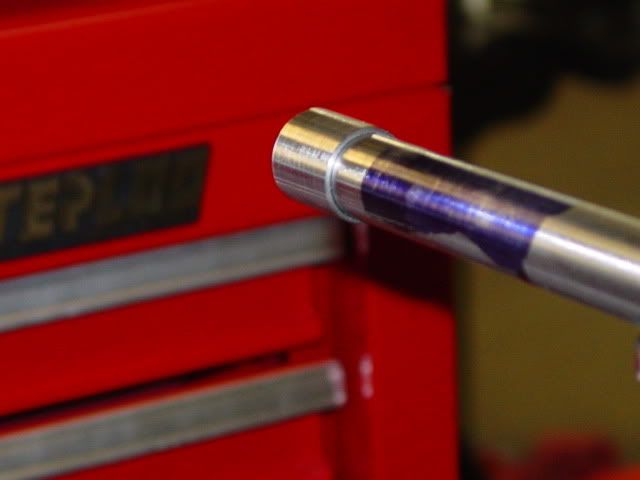 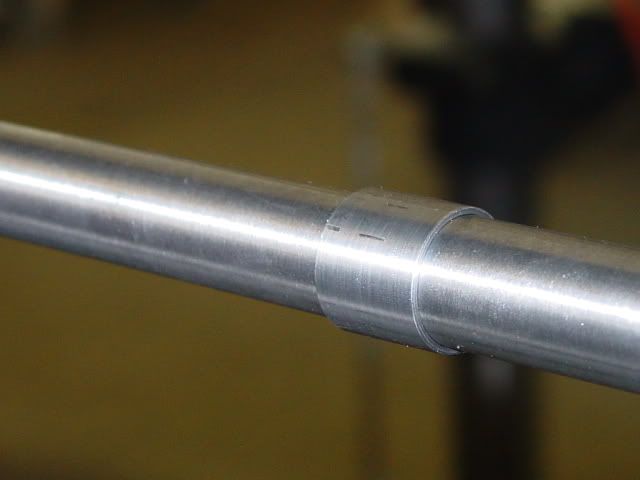 Here is a big hunk of steel that was contoured to fit snug onto the barrel and barrel band. Everyone that walks by has some little snippet to say about how high it is, but none-the-less. The sling swivel and sight metal will be welded and contoured onto the bands, and the bands will be saudered to the barrel. The end result will look like the barrel and "accesories" were cut out of one piece of steel: 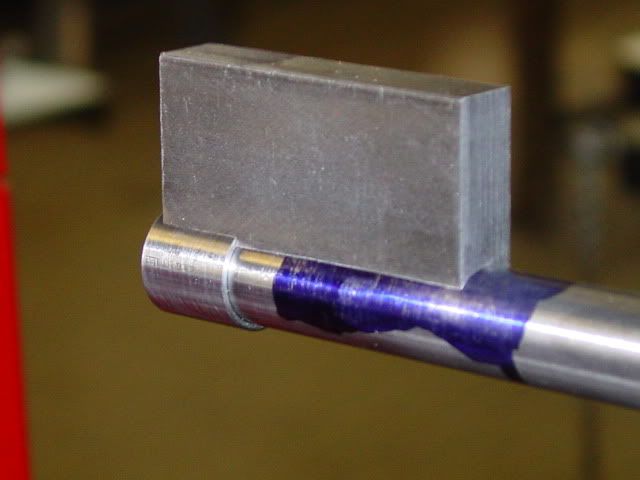
A.M. Little Bespoke Gunmakers LLC
|
|
|
|
Re: A few of my projects in gunsmithing school(pics)
[Re: TDK]
#2065854
01/28/11 03:14 AM
|
Joined: Sep 2007
Posts: 3,812
TDK
OP
Extreme Tracker
|
|
OP
Extreme Tracker
Joined: Sep 2007
Posts: 3,812 |
Now since we have an open machine I have been trying to do the most "machine" work possible while I have the chance. I started on making some scope mounts that work with Talley QD rings. These started out as hunks of steel, the bottoms were cutout to fit snug on the top of the receiver yesterday. I drilled them, counterdrilled them and installed them on the action. I'll let the pictures do the rest of the talking: 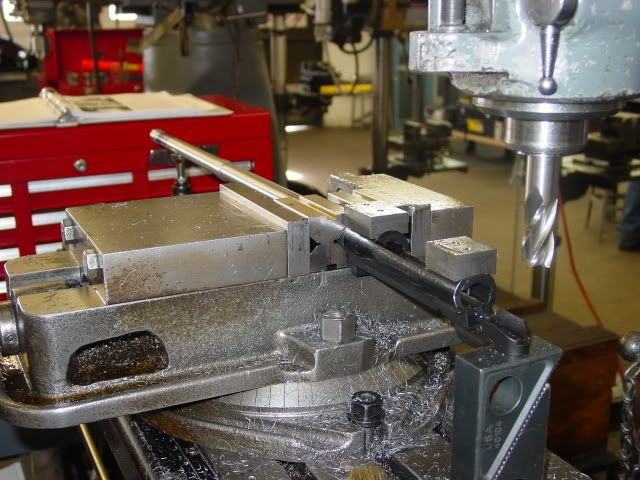 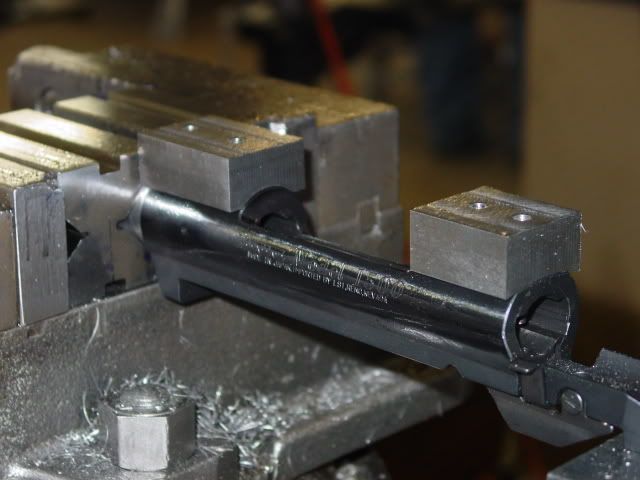 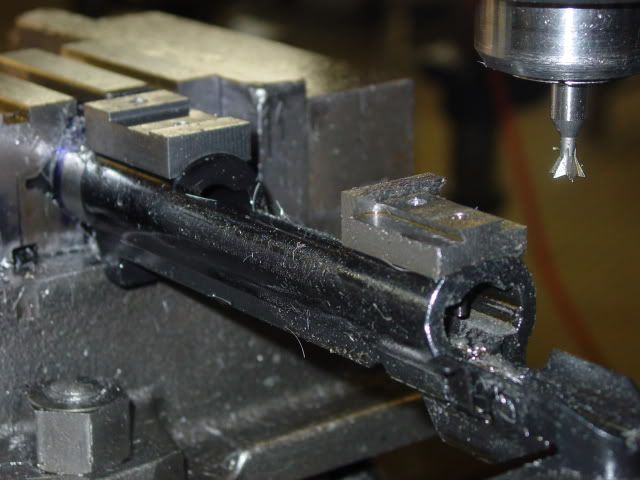 Update: My first attempt at making scope mounts did not work out, but I learned a ton of new skills, and plan to give it another shot later. I do know where I went wrong, it was a silly mistake, but I would not have been happy with the end result. I also was not able to finish the front sight and the swivel because of going out of town, then moving in to stocks class when I returned. I definently want to finish these in the future.
A.M. Little Bespoke Gunmakers LLC
|
|
|
|
Re: A few of my projects in gunsmithing school(pics)
[Re: TDK]
#2065870
01/28/11 03:19 AM
|
Joined: Sep 2007
Posts: 3,812
TDK
OP
Extreme Tracker
|
|
OP
Extreme Tracker
Joined: Sep 2007
Posts: 3,812 |
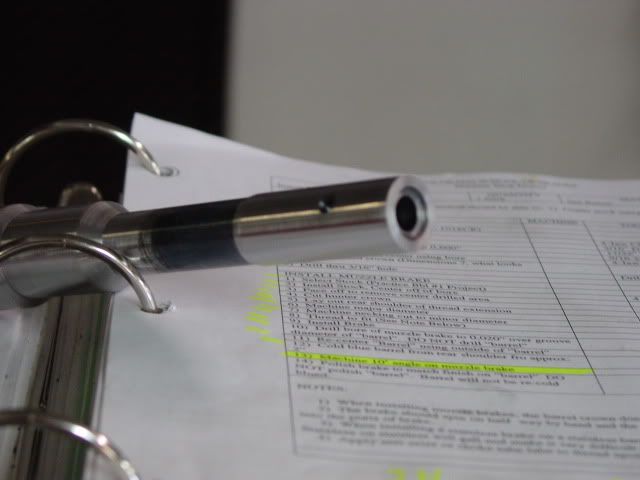
Moving into Stocks class I started with learning how to checker. I had a feeling that before I even started checkering I would probably enjoy it. Didnt know if I had the skill, patience, or focus, but needless to say after the first attempt things have improved pretty quickly. I have to say I was right about enjoying it. The first project was just learning how to space the lines. Please know that all I am doing here is "scratching" the surface deep enough for the tool to "catch" and ride in the groove. This is the first day I have ever checkered. Most checkerers would mysteriously lose work like this, but here I am posting it for the world to see. I can pick things up pretty quick, but this is not easy... Here is a pic of the layout: 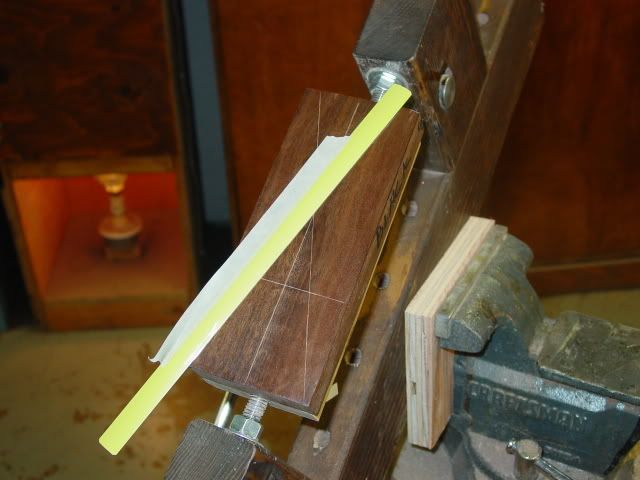 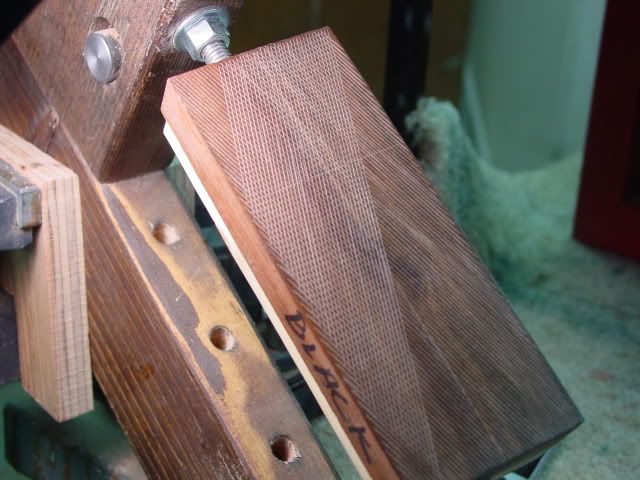 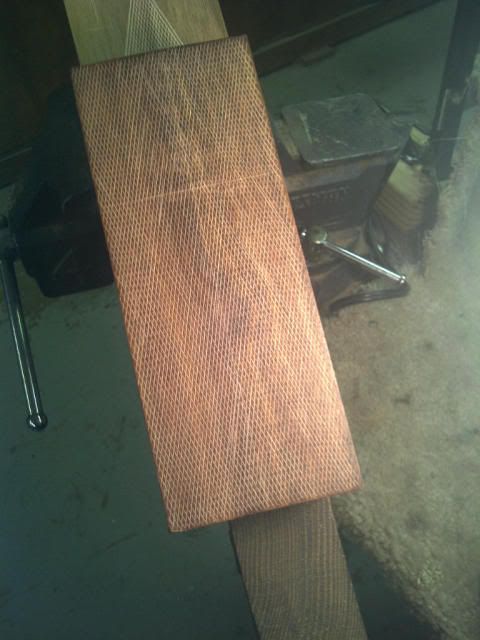
A.M. Little Bespoke Gunmakers LLC
|
|
|
|
Re: A few of my projects in gunsmithing school(pics)
[Re: TDK]
#2065872
01/28/11 03:19 AM
|
Joined: Sep 2007
Posts: 3,812
TDK
OP
Extreme Tracker
|
|
OP
Extreme Tracker
Joined: Sep 2007
Posts: 3,812 |
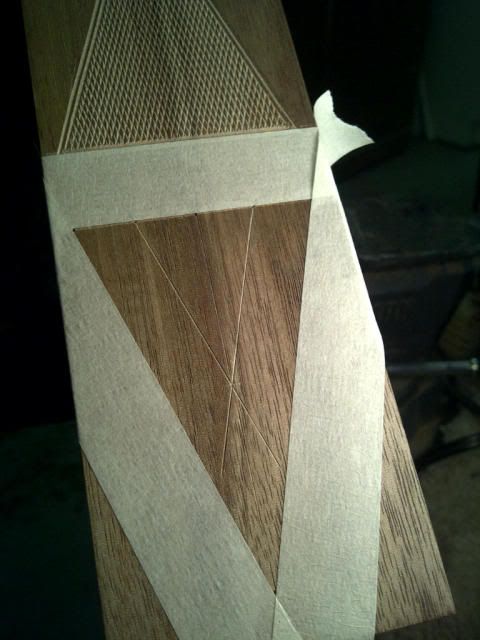
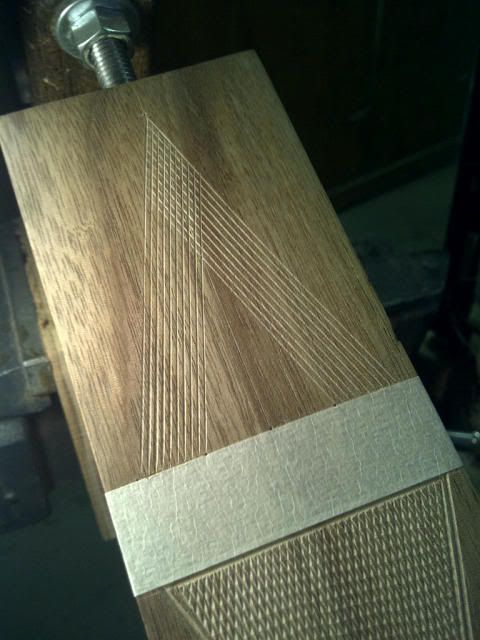
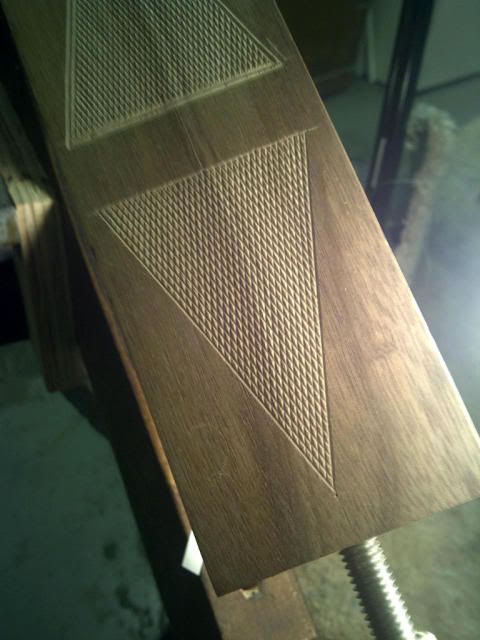
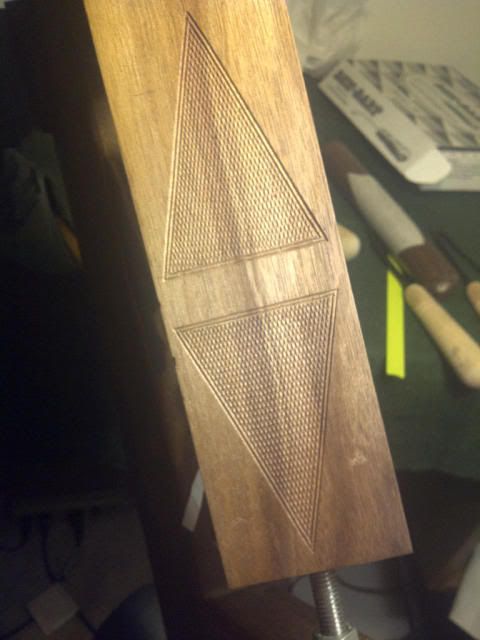
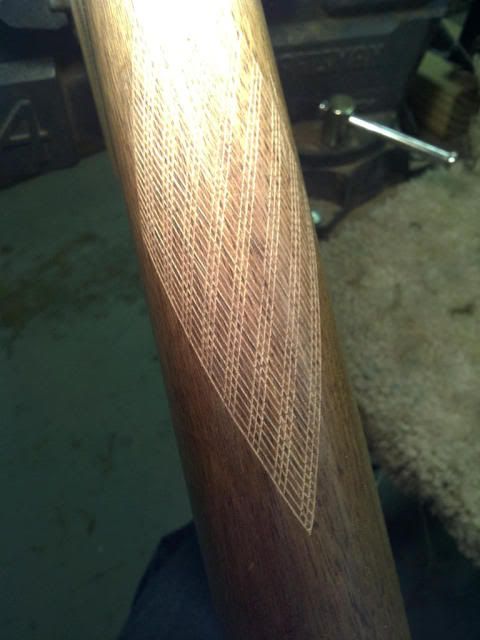
Now on to the next project. On this one I am just checkering a triangle pattern on a flat "proof". First step is to space the lines like above, then I go back behind myself and deepen the lines to produce the diamonds you all are familiar with. This took me about 4 hrs of non-stop work. Laying out and spacing. Notice the "tops" are still flat: 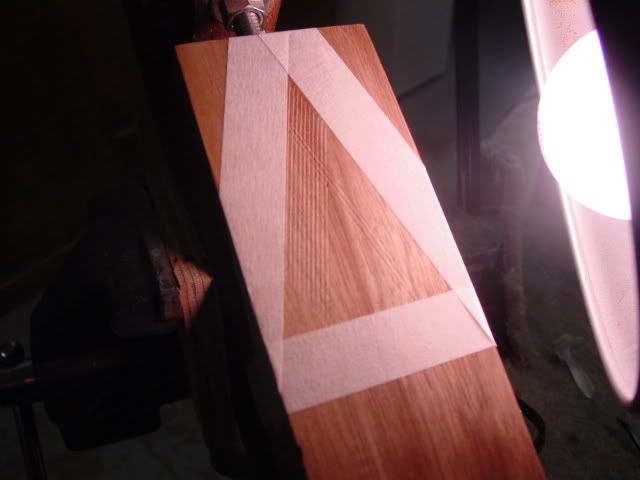 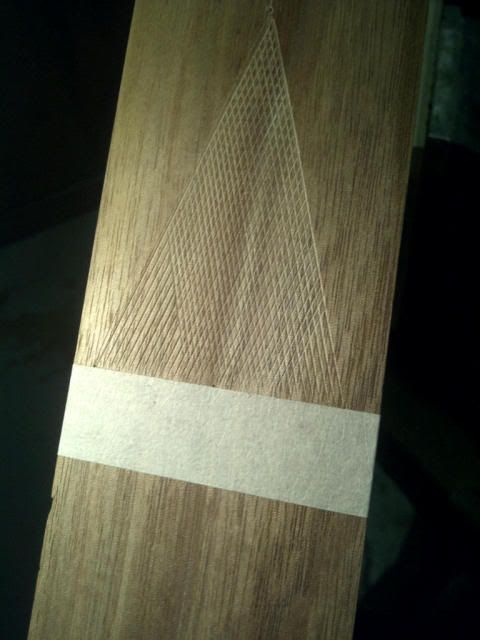 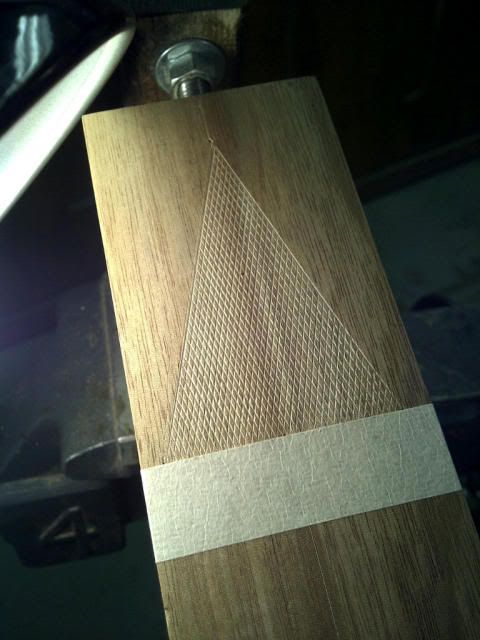 Deepened and bordered: 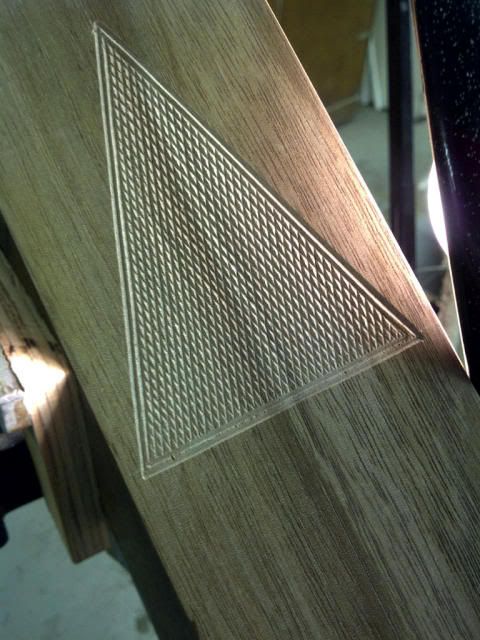
A.M. Little Bespoke Gunmakers LLC
|
|
|
|
Re: A few of my projects in gunsmithing school(pics)
[Re: TDK]
#2065879
01/28/11 03:20 AM
|
Joined: Sep 2007
Posts: 3,812
TDK
OP
Extreme Tracker
|
|
OP
Extreme Tracker
Joined: Sep 2007
Posts: 3,812 |
A.M. Little Bespoke Gunmakers LLC
|
|
|
|
Re: A few of my projects in gunsmithing school(pics)
[Re: TDK]
#2065881
01/28/11 03:21 AM
|
Joined: Sep 2007
Posts: 3,812
TDK
OP
Extreme Tracker
|
|
OP
Extreme Tracker
Joined: Sep 2007
Posts: 3,812 |
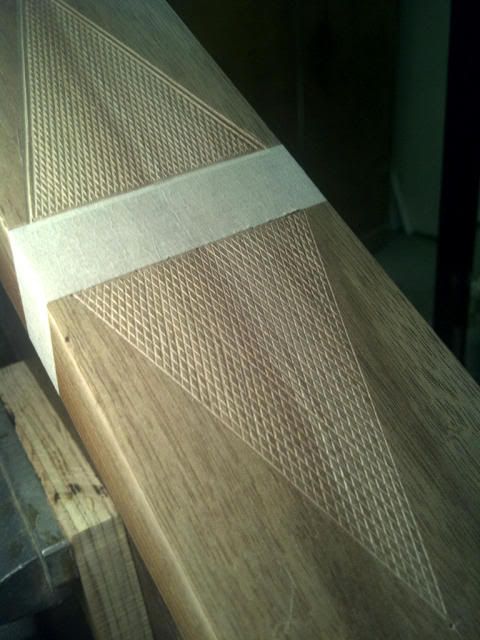
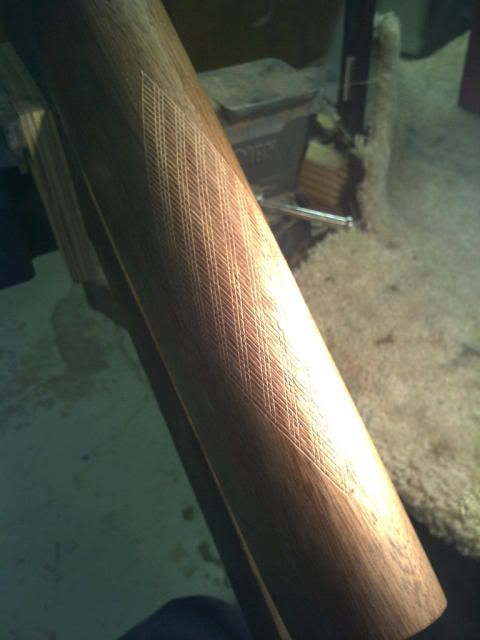
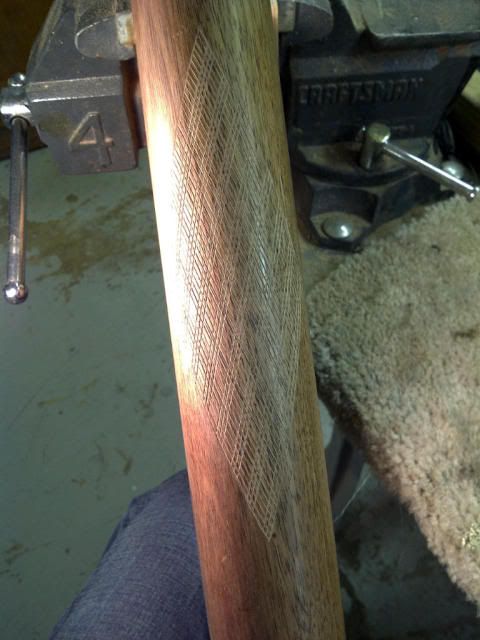
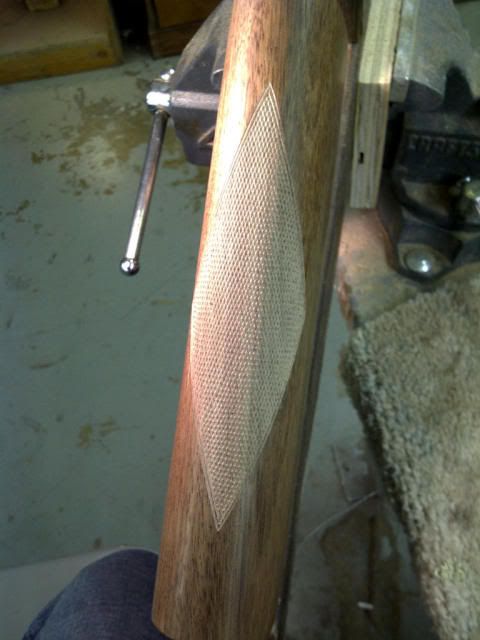
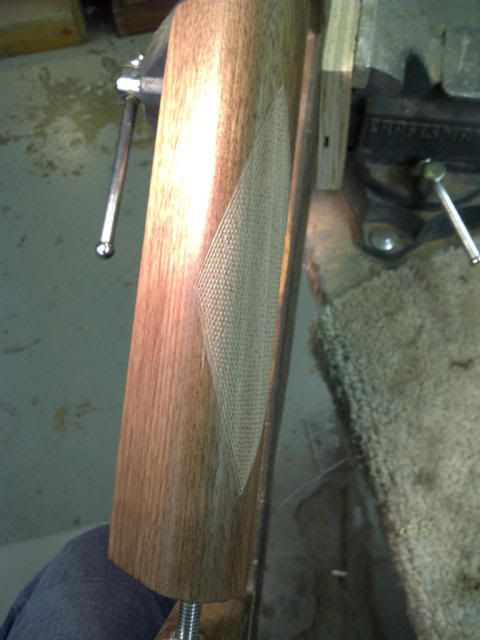
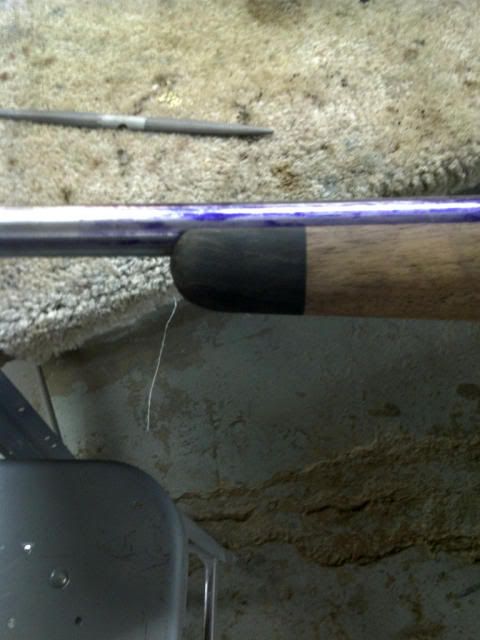
This checkering sure is hard on curved work. Had a little discussion with a Chic Worthing, he said that checkering on stuff like this seperates the men from the boys. Its true! I have to say after 2 weeks of non-stop checkering for 7 1/2hrs a day I am a little burned out. But in moderation I wouldnt mind... Here is my 4th attemp on a pretty small diameter dowel. I really dont see where checkering on something this small applies in stock work, but I guess they figure if you can do this, you can deal with any stock. Being a picky person this truly drove me nuts. 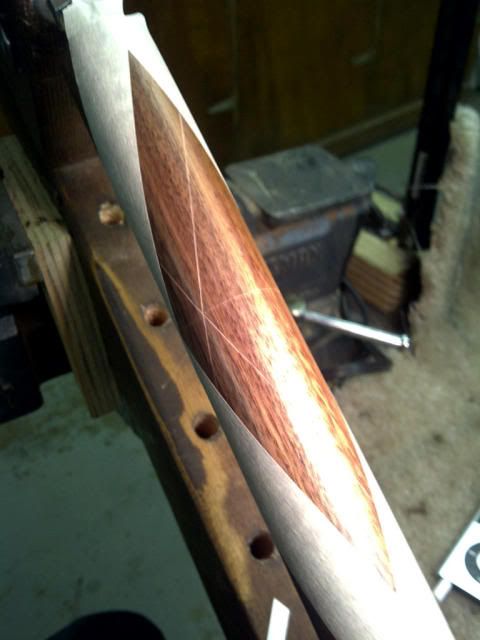 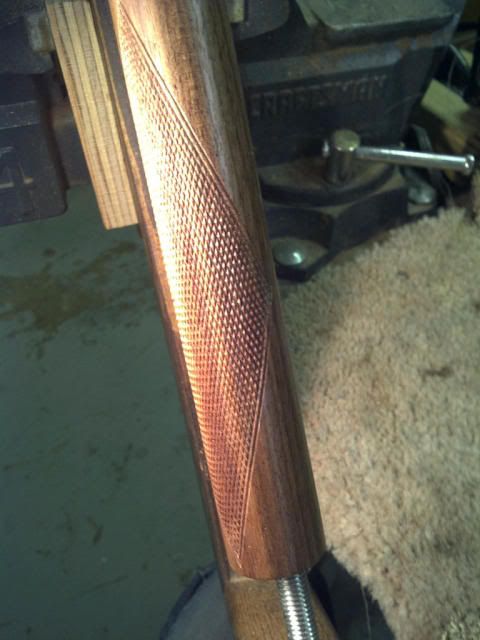 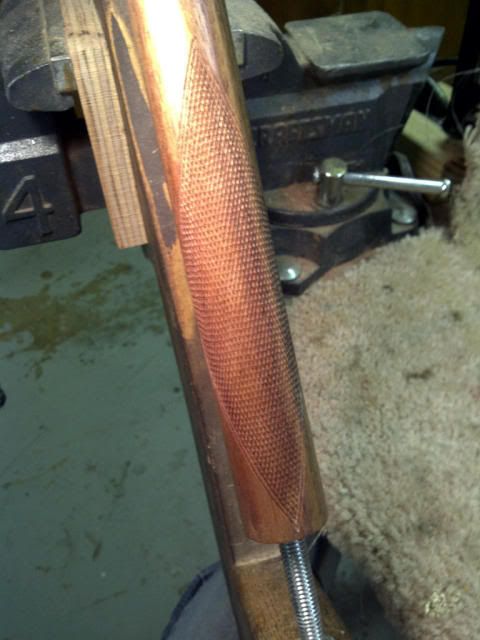
A.M. Little Bespoke Gunmakers LLC
|
|
|
|
Re: A few of my projects in gunsmithing school(pics)
[Re: TDK]
#2065883
01/28/11 03:21 AM
|
Joined: Sep 2007
Posts: 3,812
TDK
OP
Extreme Tracker
|
|
OP
Extreme Tracker
Joined: Sep 2007
Posts: 3,812 |
A.M. Little Bespoke Gunmakers LLC
|
|
|
|
Re: A few of my projects in gunsmithing school(pics)
[Re: TDK]
#2065888
01/28/11 03:22 AM
|
Joined: Sep 2007
Posts: 3,812
TDK
OP
Extreme Tracker
|
|
OP
Extreme Tracker
Joined: Sep 2007
Posts: 3,812 |
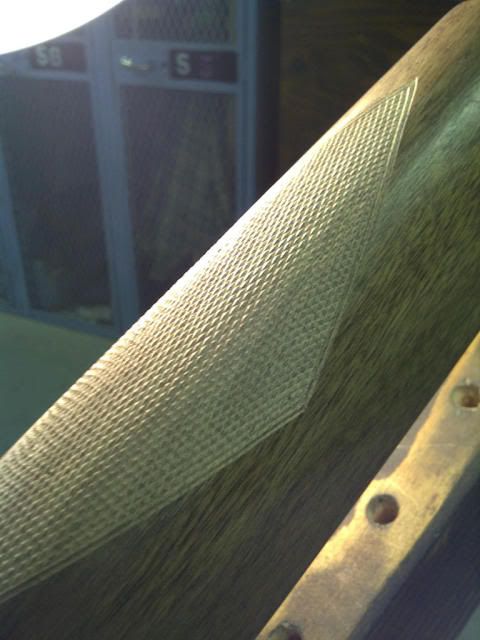
If you dont know why it is harder to checker on curved pieces it is because you are trying to put a straight line on a curve, and the straight line needs to have a line next to it that is exactly parallel. The best way I can explain the forces here is to draw it. The curverature of the wood tries to pull you in. Something like this: 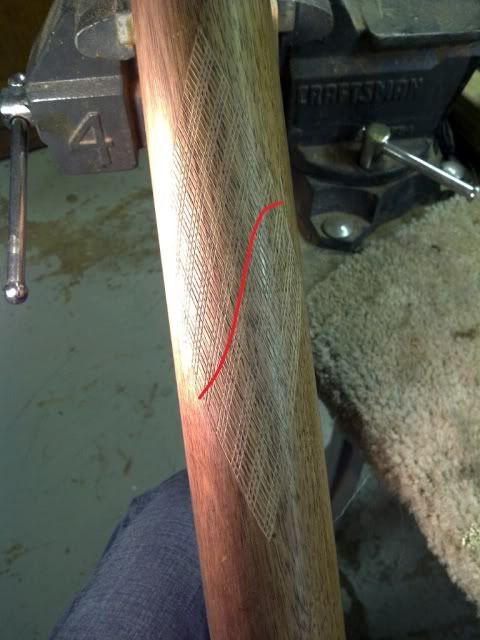 I definently plan to do a ton more practice at this. I feel it is something I have potential at. Still a long way to go until you see me doing this to a stock...
A.M. Little Bespoke Gunmakers LLC
|
|
|
|
Re: A few of my projects in gunsmithing school(pics)
[Re: TDK]
#2065910
01/28/11 03:28 AM
|
Joined: Sep 2007
Posts: 3,812
TDK
OP
Extreme Tracker
|
|
OP
Extreme Tracker
Joined: Sep 2007
Posts: 3,812 |
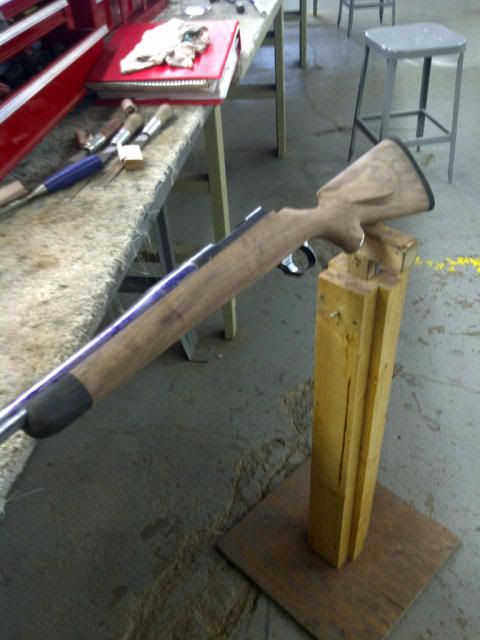
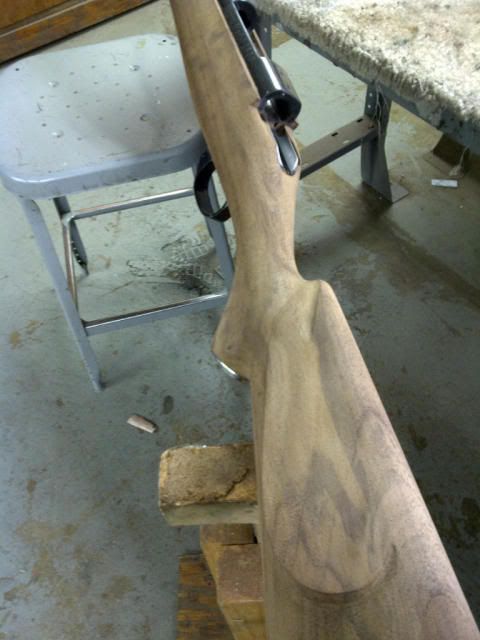
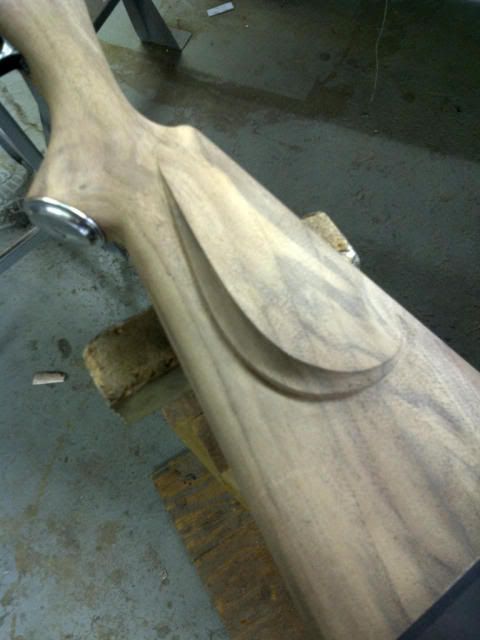
The Howa "rifle build" stock started as a roughly duplicated stock. There was no barrel channel cut into the the forend, and the bottom metal cutout and action cutout were undersized. To inlet you apply a marking substance, in this case Prusian Blue(PB) on th...e metal first. Then you have to set the barrelled action on its intended resting place. The PB will leave marks where it is contacting the wood, you then go behind with wood scrapers, chisels, and rasps to remove those spots. You do this until the barrel and action have settled down to the half depth mark, or bore centerline. You will see that on most stocks the top of the stock will stop close to the center on the barrel. If done correctly, this will result in good wood-to-metal contact, and hopefully no unwanted gaps. I wished I had taken pictures of the stock before I began working on it...maybe I will take a picture of one of the other student stocks to show what I started with. Once that is completed you then put 10mm thick tape on the bottom of the barrel, and go behind yourself and deepen the barrel channel again until the tape doesnt touch the stock anymore. What I have just accomplished by doing this is free-floating the barrel. Next step is to glass bed the action area and install pillars at the same time. No since I am trying to model the gun after the classic American style rifle I had to go by certain proportions and standards. One example is determining forearm length. To do this I take the barrel length, in this case 24" and divide that by two, to get a length of 12". Now I subtract 1" from that and get the maximum length of the forearm; 11".Any longer than this the forearm will look long. The next step is to look at the rest of the stock; the measurement from the front of the action to the point of comb, then take the measurement from the point of comb to the heel of the stock. These two numbers should be relatively close. You then take the average of those two numbers and make that the forearm lenth. In this case we came up with 9 1/2" which is what we made mine, but obviously you have room to adjust it if need be. Balance is another way to determine if you have correct propertions, my guns center of balance is directly under the front ring of the action. I actually had to cut the forearm to 7 1/2", then added the Ebony forend tip to make it 9 1/2". Some guys like to put exotic woods on their forends, and cut them at 45 degree angles...Just doesnt belong IMO. I went with a 90 degree joint, and classic black ebony; eventaully rounded. We also had the choice of doing a wood grip cap, or metal. I went with metal in this case. Just really like the classy look. The outside dimensions of the stock are oversized from the duplicator, so we can shape it to out desired dimensions or style. I wanted something relatively slim, and had to remove a lot of wood in the process using files, rasps, and sand paper. There are a lot of other propertions in the comb and grip area. I really cant describe them without a picture...Maybe one of these days I will write a short publication with pictures for my future reference, and to help others. There is more to it than just "removing the wood that doesnt look like a rifle stock". A lot of proportions and standards to follow. As you change styles you also have to change proportions. If you ever look at some of the English style rifles the proportions will be different. I would love to do one after this style near the end of school if money allows... Here are some pictures of the stock I am making for my Howa build. It started out as a roughly inletted stock. The insides were undersized, and outside oversized. I didnt get any pictures of the inletting, but have plenty of the shaping. Here are the "lines" drawn out before starting to shape: 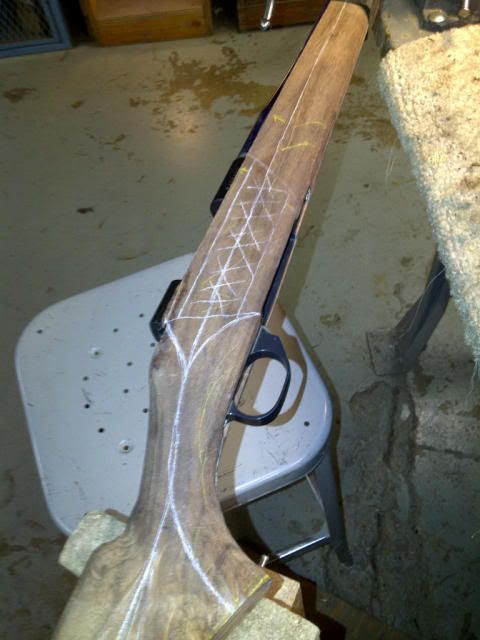 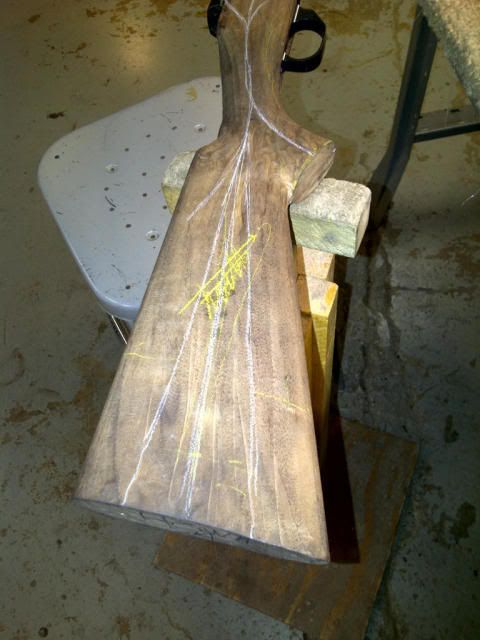 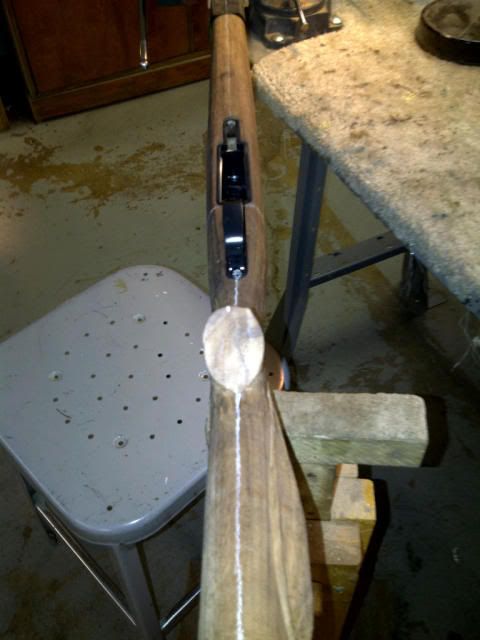 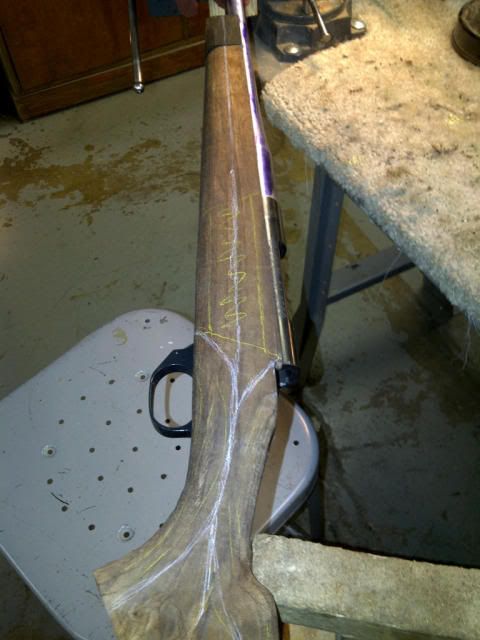 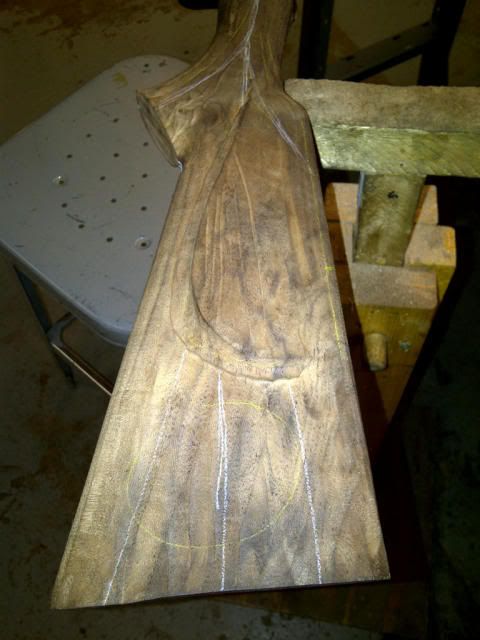
Last edited by TDK; 01/28/11 03:28 AM.
A.M. Little Bespoke Gunmakers LLC
|
|
|
|
Re: A few of my projects in gunsmithing school(pics)
[Re: TDK]
#2065922
01/28/11 03:31 AM
|
Joined: Sep 2007
Posts: 3,812
TDK
OP
Extreme Tracker
|
|
OP
Extreme Tracker
Joined: Sep 2007
Posts: 3,812 |
A.M. Little Bespoke Gunmakers LLC
|
|
|
|
Re: A few of my projects in gunsmithing school(pics)
[Re: TDK]
#2065925
01/28/11 03:32 AM
|
Joined: Sep 2007
Posts: 3,812
TDK
OP
Extreme Tracker
|
|
OP
Extreme Tracker
Joined: Sep 2007
Posts: 3,812 |
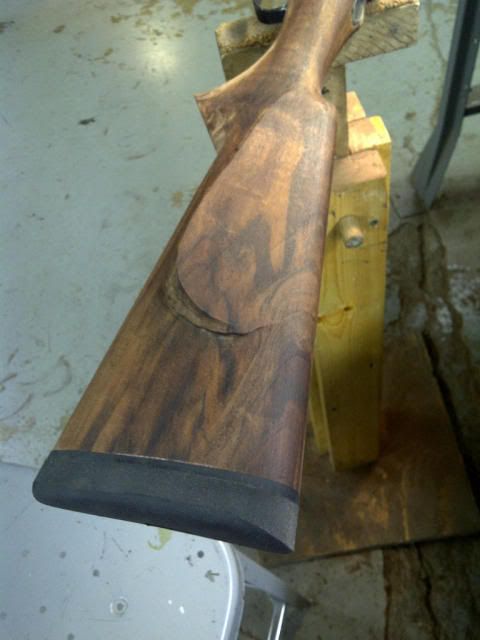
Here it is in the beginning stages of finishing. Sadly we have very little say on what we can use for finish, so I personally would not do it this way. Anyways they had me apply one coat of verathane(yuck) to seal it, then after drying I did one mud rub. This is where I got in trouble. The main instructor was out of town, so I asked the other teacher if I could use Daly's Benmatte for the mud rubs and hand rubs. No problem. A lot of top notch stockmakers use Daly's products; Chic Worthing and Duane Wiebe to name just two. I really like how it works and the look it gives. Here it is after removing the mud rub: 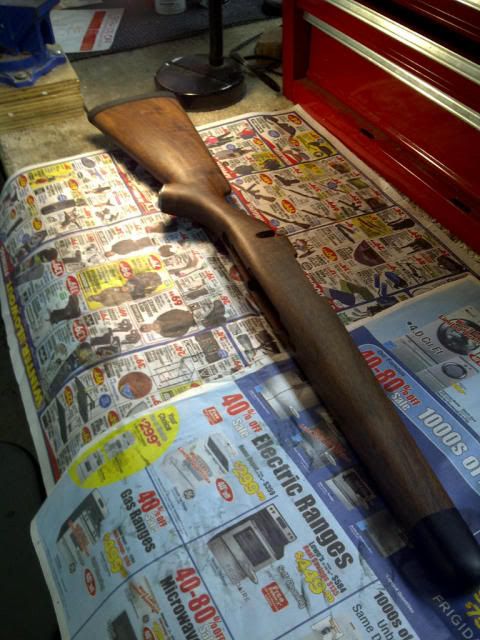 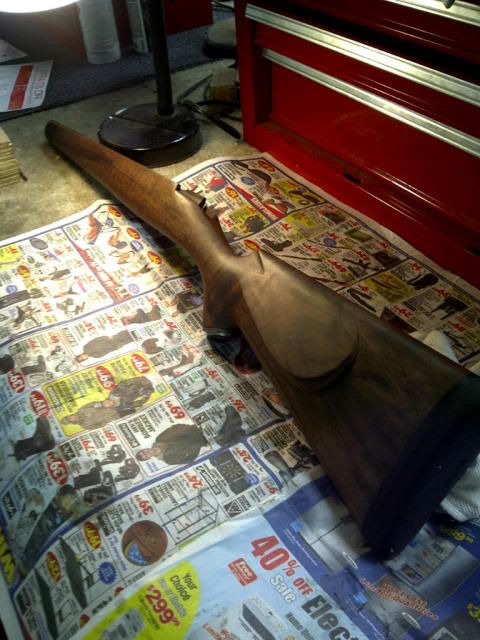 Let that dry for a few days and picked it back up today. I start to remove the mud rub and the teacher asks what I am using...busted. So it looks like I am back to using Velvet Oil. Im a little disgusted(to put mildly) I have no say ON MY GUN. But i will suck it up and do it the way they want. Its getting stripped and re-done with Daly's at home after being graded. I do not like Velvet Oil.
A.M. Little Bespoke Gunmakers LLC
|
|
|
|
Re: A few of my projects in gunsmithing school(pics)
[Re: TDK]
#2065937
01/28/11 03:34 AM
|
Joined: Mar 2009
Posts: 4,423
jeffbird
Extreme Tracker
|
|
Extreme Tracker
Joined: Mar 2009
Posts: 4,423 |
TDK, This really is interesting. Thank you for posting it. Nice looking work. Hang in there and good luck with your career. 
|
|
|
|
Re: A few of my projects in gunsmithing school(pics)
[Re: TDK]
#2065940
01/28/11 03:34 AM
|
Joined: Sep 2007
Posts: 3,812
TDK
OP
Extreme Tracker
|
|
OP
Extreme Tracker
Joined: Sep 2007
Posts: 3,812 |
Here is the Howa barrelled action polished. I hand polished it to 400 grit, then took it to the matchless wheel. Lastly I tamed it back down with a gray scotch-brite pad to give it a satin look. It not completely done, but close. Got a few spots that need attention. 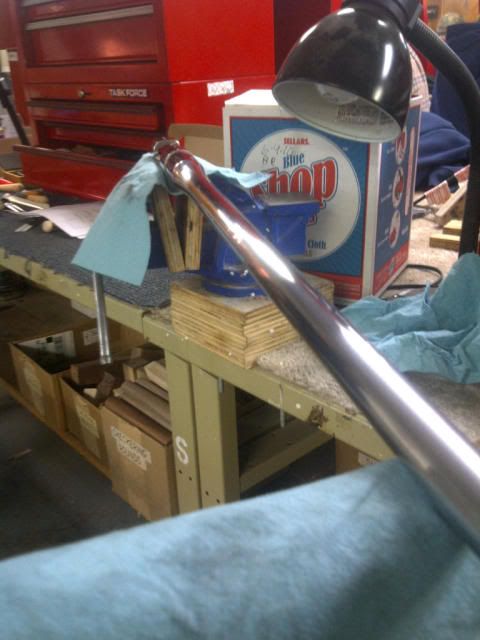
A.M. Little Bespoke Gunmakers LLC
|
|
|
|
Re: A few of my projects in gunsmithing school(pics)
[Re: jeffbird]
#2065964
01/28/11 03:40 AM
|
Joined: Dec 2008
Posts: 6
870Fan
Green Horn
|
|
Green Horn
Joined: Dec 2008
Posts: 6 |
TDK,
I second jeffbird's comments. Please keep posting your work. You may be creating a client base before you get out of school. Was the picture of the A5 taken at Colorado Clays? I hope you are enjoying Colorado. Been missing it for 5 years now.
|
|
|
|
Re: A few of my projects in gunsmithing school(pics)
[Re: 870Fan]
#2065975
01/28/11 03:42 AM
|
Joined: Sep 2007
Posts: 3,812
TDK
OP
Extreme Tracker
|
|
OP
Extreme Tracker
Joined: Sep 2007
Posts: 3,812 |
Yes, it actually was taken at Colorado Clays LLC.
A.M. Little Bespoke Gunmakers LLC
|
|
|
Moderated by bigbob_ftw, CCBIRDDOGMAN, Chickenman, Derek, DeRico, Duck_Hunter, hetman, jeh7mmmag, JustWingem, kmon11, kry226, kwrhuntinglab, Payne, pertnear, rifleman, sig226fan (Rguns.com), Superduty, TreeBass, txcornhusker
|